Content Management: Navigating Your Website Dashboard

Content Management:
Navigating Your Dashboard
Your dashboard is the command centre of your website. Once you know where everything lives, managing content becomes fast, predictable, and even enjoyable. This guide walks you through the essentials — from first login to publishing polished posts.
Dashboard Overview
The admin interface is organised around three core areas. Master these and you control everything on your site.
Posts
Create and manage blog entries, news updates, and articles. Posts are date-stamped and categorised — perfect for regularly updated content.
Pages
Static content like your homepage, About, Services, and Contact pages. Pages have no date and sit outside the blog feed — they define your site's structure.
Plugins
Extend functionality without writing code. From SEO tools to contact forms to e-commerce — plugins cover virtually every use case.
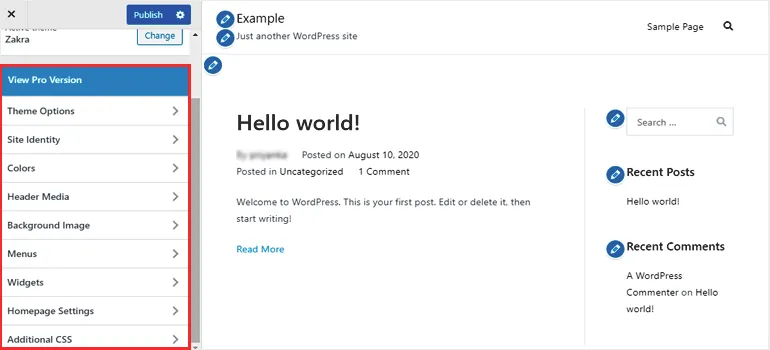
Getting Started: Accessing wp-admin
Your content management dashboard is easily accessible through a direct link. Here's how to log in and orient yourself in the first 60 seconds.
Go to your login URL
Navigate to yoursite.com/wp-admin in your browser. Bookmark this — you'll use it every session.
Enter your credentials
Use the username and password set during installation. Enable"Remember Me" only on personal, secure devices.
Explore the left sidebar
The sidebar is your navigation hub. Posts, Pages, Media, Appearance, Plugins, Settings — all here. Hover over each item to see submenus.
Check the Dashboard home
The main Dashboard screen shows site health, recent activity, and quick draft widgets. It's your at-a-glance status board.
Three Core Content Tasks
These are the actions you'll perform most often. Each takes under five minutes once you know the flow.
Adding Blog Posts
Step 1
Go to Posts → Add New in the left sidebar.
Step 2
Enter your title, write content using the visual editor. Add images, headings, and lists with the + button.
Step 3
Set categories, tags, and a featured image in the right panel. Click Publish — your post is live.
Editing Pages
Step 1
Navigate to Pages → All Pages. Hover over any page to see Edit, Quick Edit, Trash, and View options.
Step 2
Click Edit to open the full block editor. Make changes directly on the page — each section is an independent block.
Step 3
Use Preview to check how changes look before going live. Then hit Update to save.
Managing Media
Step 1
Go to Media → Library. All uploaded images, PDFs, and files are stored here in a searchable gallery.
Step 2
Click Add New to upload files (drag-and-drop supported). Edit alt text, title, and caption immediately after upload.
Step 3
Click any file to edit its metadata. Always fill in Alt Text — it's required for accessibility and SEO.
Pro Tips for Power Users
Keyboard Shortcuts
Use Ctrl+S to save drafts instantly. In the block editor, press / to insert any block by name. Speed up repetitive tasks dramatically.
Preview Before Publishing
Always click Preview → Preview in new tab before hitting Publish. Spot broken layouts, missing images, and formatting issues before your visitors do.
Schedule Regular Backups
Set up automated daily backups to a secure cloud location. Test your backups regularly — a backup you never tested is not a backup.
Who Gets Which Access
Most content accidents happen because everyone logs in as an administrator. The dashboard ships with roles — use them so each person can do their job and nothing more.
| Role | Can do | Give it to |
|---|---|---|
| Administrator | Everything: plugins, themes, users, settings | One or two people who own the site — and your developer while a project is running |
| Editor | Publish and edit any post or page, moderate comments | The person responsible for content quality |
| Author | Write, publish and edit their own posts | Regular in-house writers |
| Contributor | Write drafts, cannot publish or upload files | Freelancers and guest writers — an editor approves every piece |
Give every person their own login, switch on two-factor authentication for administrators and editors, and remove accounts the day someone leaves. Shared logins make it impossible to tell who changed what.
Before You Press Publish
A post is read by two audiences: people and search engines. Five fields decide whether the second audience ever sends you the first.
- Title with the phrase people search for. «Kitchen renovation cost in 2026» beats «Our thoughts on renovations». Keep it under 60 characters so it is not cut off in search results.
- Short, readable URL (slug). Edit it before the first publish: /kitchen-renovation-cost, not /2026/09/our-thoughts-on-renovations-2. Changing it later breaks links.
- Meta description. One or two sentences, up to about 155 characters, that promise a concrete answer. Your SEO plugin or the post settings panel has a field for it.
- Headings in order. One main title, then sections as Heading 2, sub-points as Heading 3. Never pick a heading level just because you like its size.
- Alt text and file size for every image. Describe what the image shows in plain words, and upload images no wider than your content column — a 5 MB phone photo slows the page for every visitor.
Then add two or three links to related pages or posts on your own site. Internal links help readers go deeper and show search engines which pages matter most.
A 30-Minute Monthly Routine
Updates, in the right order
Take a backup, then update plugins one by one, then the theme, then the core. Open the homepage, a post, the contact form and checkout after each step. If something breaks, you know exactly which update caused it.
Refresh what already ranks
Open your analytics, find the ten posts that bring the most visitors, and check them for outdated prices, years and broken links. Updating a page that already ranks usually pays back faster than writing a new one.
Clean the media library
Look for duplicated uploads and huge original files. Replace oversized images with compressed versions and fill in missing alt text — both improve speed and accessibility.
Review users and forms
Remove logins nobody uses and send a test message through every form. A silent contact form can cost you leads for weeks before anyone notices.
Five Mistakes That Break Sites
Installing a plugin for every small task
Each plugin adds code, update work and a possible security hole. Before installing one, ask whether your theme or an existing plugin already does the job.
Editing the live theme
Changes made in the theme editor disappear with the next theme update — or take the whole site down with one typo. Design changes belong in a child theme or in the hands of your developer.
Deleting pages that bring visitors
Before removing an old page, check whether it gets traffic or links. If it does, update it or point its address to the closest replacement instead of leaving a dead link.
Publishing without preview on a phone
More than half of visits usually come from phones. Preview every new page at mobile width — wide tables and huge images are the usual culprits.
Trusting backups nobody restored
Once a quarter, restore a backup to a test copy of the site. It is the only way to know that the day you need it, it works.
Key Takeaway
The dashboard is not complex — it's structured. Once you've added your first post, edited a page, and uploaded media, the rest follows naturally. The block editor is intuitive; the sidebar is consistent; and with keyboard shortcuts, your workflow becomes genuinely fast. Invest 30 minutes exploring — it pays back immediately.
Keep Reading
- SEO insights: optimizing your website for Google — what to do after your first posts are live.
- Security and maintenance: keeping your website safe — the maintenance routine in more depth.
- Website support after launch — how to work with your developer once the site is live.
Rather spend the time on your business?
We set up roles, publishing templates, backups and updates so your team only writes — and we handle the technical routine every month.
Related Articles


Related services






Frequently Asked Questions
Honest answers about how we work, what it costs, and what you can expect

Comments (0)
No comments yet. Be the first!